Live streaming has become an indispensable part of modern events, from corporate conferences and music festivals to worship services and sports tournaments. As audiences increasingly expect broadcast-quality video delivered in real time, event organizers face mounting pressure to deliver flawless streams without interruption. Yet the reality on the ground often tells a different story—unreliable equipment drops signals mid-broadcast, complex setups consume hours of valuable preparation time, and inconsistent video quality frustrates both producers and viewers alike. These challenges can turn what should be a seamless production into a stressful ordeal.
HDMI encoders have emerged as a critical solution to these pain points, serving as the bridge between professional camera equipment and online streaming platforms. By converting raw HDMI video signals into streamable formats, these devices enable event organizers to achieve high-quality, dependable broadcasts with far less complexity than traditional production workflows. In this article, we’ll explore how HDMI encoders work, what to look for when selecting one, how to set up your streaming system step by step, and how to expand your reach through IPTV integration—giving you the practical guidance needed to elevate your live events.
Understanding HDMI Encoders: The Core of Professional Live Streaming
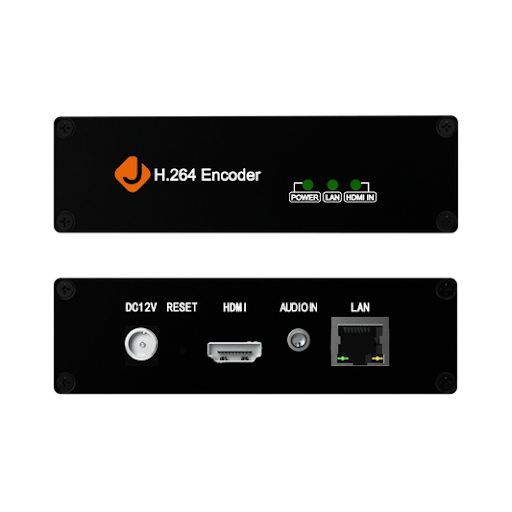
An HDMI encoder is a hardware device that takes a raw HDMI video signal from a camera, switcher, or computer and converts it into a compressed digital stream suitable for transmission over IP networks. This conversion process transforms uncompressed video data into standardized streaming protocols like RTMP, SRT, or HLS, making it possible to deliver content directly to platforms such as YouTube, Facebook Live, or custom streaming servers.
For event organizers seeking high-quality video delivery, HDMI encoders serve as the essential link between production equipment and online audiences. Without them, there’s no practical way to move a professional camera feed onto the internet in real time. Their importance extends beyond simple signal conversion—modern encoders maintain consistent frame rates, preserve color accuracy, and ensure audio synchronization throughout extended broadcasts. The core benefits that make HDMI encoders indispensable for professional live streaming include rock-solid reliability during multi-hour events, broad compatibility with existing streaming equipment such as cameras, mixers, and capture cards, and native support for live streaming workflows that require minimal operator intervention once configured. These qualities make encoders the foundation upon which dependable broadcast systems are built.
Choosing the Right HDMI Encoder for High-Quality Video Output
Selecting the right HDMI encoder requires careful consideration of several factors that directly impact your broadcast quality and operational reliability. Resolution support tops the list—if your cameras capture in 4K, your encoder must handle that resolution without downscaling or introducing artifacts. Even if you’re currently streaming in 1080p, choosing an encoder capable of 4K processing provides headroom for future upgrades and ensures your high-quality video signal remains pristine throughout the encoding pipeline.
Bitrate control is equally critical for maintaining consistent stream quality across varying network conditions. Look for encoders that offer both constant bitrate (CBR) and variable bitrate (VBR) modes, giving you flexibility to prioritize either consistent bandwidth usage or optimal visual quality depending on your venue’s internet infrastructure. Durability matters too—event environments subject streaming equipment to heat, dust, and the occasional bump during load-in. Metal chassis construction, fanless cooling designs, and industrial-grade components distinguish encoders built for the field from those designed for desktop use only. Manufacturers like J-Tech Digital Inc specialize in AV transmission and processing equipment engineered to withstand the demands of professional environments, offering the kind of robust build quality that event organizers depend on.
Key Features to Look for in a Reliable HDMI Encoder
Low latency should be a non-negotiable requirement, particularly for interactive events where audience engagement depends on near-real-time delivery. Encoders achieving sub-second latency keep remote viewers synchronized with the live experience. Support for multiple encoding formats—specifically H.264 for broad compatibility and HEVC (H.265) for superior compression efficiency—ensures your streams reach every platform and device without compatibility issues. On the connectivity side, verify that your encoder provides solid HDMI input connections alongside Gigabit Ethernet output, as network throughput directly determines your maximum streaming bitrate. Some models also include Wi-Fi or bonded cellular options as failover paths, adding an extra layer of reliability for live events where a dropped stream is simply not acceptable.
Step-by-Step Setup Guide for HDMI Encoders in Live Streaming
Setting up an HDMI encoder for live streaming doesn’t need to be complicated, but following a structured approach ensures you avoid common pitfalls that lead to failed broadcasts. Whether you’re preparing for a corporate keynote or a multi-camera concert stream, the process breaks down into three phases: physical connections, software configuration, and pre-event testing. Taking time to complete each phase methodically will save you from troubleshooting under pressure when the event goes live.
Connecting Your HDMI Encoder to Streaming Equipment
Start by connecting your camera or video switcher’s HDMI output to the encoder’s HDMI input using a certified high-speed HDMI cable—cheap cables are the most common source of intermittent signal drops during long events. Run a Cat6 Ethernet cable from the encoder’s network port directly to your router or network switch, avoiding Wi-Fi for your primary connection whenever possible. Confirm that your network switch supports Gigabit speeds, as Fast Ethernet (100 Mbps) creates a bottleneck that limits your streaming bitrate. Power on the encoder and verify that the input signal is detected, typically indicated by a status LED or on-screen dashboard showing the incoming resolution and frame rate. If your setup includes audio from an external mixer, connect it before powering up so the encoder locks onto the audio source during initialization.
Configuring Software for Optimal Streaming Performance
Access your encoder’s web interface through a browser using its assigned IP address, then navigate to the streaming settings panel. Set your output resolution to match your target platform’s recommended specs—1080p at 30fps works reliably for most scenarios, while 60fps suits fast-motion content like sports. Configure your bitrate between 4,500 and 6,000 kbps for 1080p streams, using CBR mode if your upload bandwidth is stable or VBR if you need the encoder to adapt dynamically. Enter your streaming platform’s RTMP server URL and stream key, which you’ll find in YouTube Live’s dashboard, Facebook Live Producer, or your custom media server settings. Run a five-minute test stream at least one hour before your event begins, checking for dropped frames, audio sync issues, and buffering on the viewer side. If you notice frame drops, reduce your bitrate incrementally until the stream stabilizes, and always confirm that your upload speed provides at least 1.5 times your target bitrate as headroom.
Integrating HDMI Encoders with IPTV Solutions for Expanded Reach
Beyond streaming to a single platform, HDMI encoders can feed directly into IPTV solutions that distribute your live content across multiple destinations simultaneously. This integration transforms a single encoded stream into a broadcast that reaches in-house television displays, remote viewing apps, web-based players, and third-party platforms—all from one source signal. For event organizers managing large-scale conferences or multi-venue festivals, this approach eliminates the need to run separate encoding chains for each output destination.
The practical benefits of pairing HDMI encoders with IPTV solutions are substantial. Scalability becomes straightforward because adding new viewing endpoints doesn’t require additional encoding hardware—your IPTV middleware handles distribution to hundreds or thousands of concurrent viewers. Audience reach expands naturally when your content flows to both public streaming platforms and private internal networks simultaneously, serving remote attendees and on-site overflow rooms with equal quality. Many IPTV solutions also provide built-in analytics, giving organizers real-time insight into viewer counts, geographic distribution, and stream health across all endpoints. To implement this workflow, configure your HDMI encoder to output a multicast or unicast stream to your IPTV server, which then repackages the content into appropriate formats for each delivery channel—whether that’s HLS for mobile devices, RTMP for social platforms, or UDP multicast for local network displays.
Best Practices for Event Organizers Using Streaming Equipment
Successful live events depend as much on preparation discipline as on equipment quality. Conduct thorough equipment checks at least 48 hours before every event—test every cable, verify encoder firmware is current, and confirm that your streaming credentials haven’t expired. Always maintain a backup plan: keep a spare encoder on standby, pre-configure a secondary internet connection through cellular bonding or a separate ISP, and document your complete streaming settings so any team member can rebuild the configuration quickly if hardware fails. During the broadcast itself, assign someone to monitor stream health continuously—watching for bitrate fluctuations, dropped frames, or audio drift that viewers will notice before your production team does. Invest in dependable, professional-grade streaming equipment rather than consumer alternatives, because the cost of a failed broadcast at a major event far exceeds the price difference between reliable and budget gear. These habits, practiced consistently, turn live streaming from a high-risk endeavor into a repeatable, professional workflow.
Building a Reliable Live Streaming Workflow with HDMI Encoders
HDMI encoders stand at the heart of every successful live streaming operation, transforming raw camera feeds into polished, professional broadcasts that meet modern audience expectations. Throughout this guide, we’ve explored how these devices function as the essential bridge between production equipment and online platforms, and why factors like resolution support, bitrate control, low latency, and build quality should drive your purchasing decisions. The step-by-step setup process—from physical connections through software configuration and pre-event testing—provides a repeatable framework that removes guesswork from broadcast preparation. By integrating your HDMI encoder with IPTV solutions, you unlock the ability to reach audiences across multiple platforms and viewing environments simultaneously, maximizing the impact of every event you produce.
The path to consistently flawless live streams begins with investing in reliable, professional-grade streaming equipment and committing to the preparation habits that separate polished productions from problematic ones. Take the guidance outlined here, apply it to your next event, and build the confidence that comes from knowing your broadcast infrastructure won’t let you down when it matters most.